Plant Guide/Warranty Info
WELCOME to our Plant Maintenance Guide. Review the list below and click one of the following SUBJECTS to take you directly to where you’d like to go!
A. If a plant covered by our guarantee dies within the first year, we provide a one-time replacement for that plant. If purchased, a second-year guarantee will not transfer to the replacement.
B. Your original receipt and/or contract must be provided with a written complaint in order to move forward with a complaint. No other documentation will be accepted.
C. We have the option to inspect the plant or plants complained of prior to potential repair or replacement.
D. If we did the original planting, the labor to replace a guaranteed plant is included in the replacement of the original plant.
E. Deciduous trees and shrubs purchased and planted while dormant are guaranteed to come into foliage the first growing season after purchase.
F. These aforementioned guarantees only apply if all charges have been paid in full accordance with the contract and providing that the plant has received proper care from the owner (including watering, feeding, spraying for disease and insect control). For proper plant care, please refer to our Plant Maintenance Guide.This guarantee also does not cover losses due to drought, storms, severe winters, animal damage, or other factors beyond our control. Plant performance, such as flowering, leaf color, and rate of growth, are not guaranteed.
G. Plants (and other items) not covered by our guarantee are as follows: annuals, perennials, hybrid roses, sod, sod installation, seed installation, plants that have been replaced once already, plants purchased at clearance.
H. The Purchaser waives all statutory warranties and all warranties implied by law in connection to the purchase of these plants and agrees that the only warranties made by us are those set forth on this page.
I. NO CASH REFUNDS ARE PERMITTED – only plant replacement and repair.
2. The amount of water to give plants depends on many factors. Environmental factors that require more watering include - sun, wind, high temperature, season, lack of rain or plants are under an overhang. Remember that having one of these factors present is enough for a plant to dry out—so it could be cold, but if it’s windy, you still need to check for water.
The type of plant is another factor that helps determine how much water to give a particular plant:
Perennial Beds: Established perennial beds (beds that have existed for more than 2 years) should get an average of 1” of water a week. If there is no rain, this means running a sprinkler for at least one hour on the entire bed. Or you can hand-water thoroughly to soak the soil. To test if the soil is soaked, stick your finger down to the second knuckle. When using a sprinkler, remember that they do not always hit all plants in the garden. Other plants, tree trunks, other objects and the angle of the water spray can cause “shadows” to be cast over areas and these areas do not receive water. Be sure to look for these areas and find a way for them to get sufficient water.
Annuals in beds: More water is usually required for these plantings. If there is no irrigation, make sure to keep a close eye on annual plantings. If you see the plants wilting, it is definitely time to check the water!
Trees and Shrubs: When watering trees and large shrubs, it is important to really soak the plant’s root system. For this reason, we recommend setting up a hose to slowly drip at the base of the plant for an hour or two. This means turning on the wand or hose at about quarter power. If possible, move the hose to a few different spots to get an even soaking. This ensures that the water will go deeply enough into the soil and the roots will be encouraged to grow deeper and wider.
Watering for Winter: It’s a good idea to water all evergreen trees and shrubs that have been planted within the last 2- 3 years before winter begins (November is a good time). Evergreens continue to transpire water through their leaves in the winter, so watering before everything freezes is always a good idea.
Newly planted trees and shrubs need regular and consistent watering until root systems establish. Trees and shrubs need moist, but not saturated, soil in order to grow well, resist insects, diseases and winter injury, and to produce flowers and fruit.
Root systems of trees and shrubs, whether bare root, balled and burlapped, or in a container, are severely reduced or restricted.
After planting, root systems will grow and establish until they are much wider than the above ground portion of the plant.
WHEN TO WATER
Newly planted trees or shrubs require more frequent watering than established trees and shrubs.
They should be watered at planting time and at these intervals:
- 1-2 weeks after planting, water daily.
- 3-12 weeks after planting, water every 2 to 3 days.
- After 12 weeks, water weekly until roots are established.
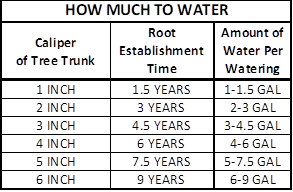
HOW MUCH TO WATER
Establishment times for trees increases with tree size. Trunk caliper at planting time can be used to determine the time it takes for roots to establish.
FIRST – you’ll need to figure out the diameter of your tree.
Measure the trunk diameter at 6 inches above the ground for diameters up to 4 inches.
If the diameter is more than 4 inches, measure at 12 inches above the ground.
Once you’ve measured the caliper of your tree trunk, use the chart below to determine how much water it will need each time you water it.
WHERE TO WATER
- Apply water directly over the root ball.
- Be sure to keep the backfill soil in the planting hole moist. This encourages the roots to expand beyond the root ball into the backfill soil.
- Create a water reservoir by making a circular mound of earth 3 to 4 inches high around the plant at the edge of the root ball.
- Use a slow trickle of water to fill the reservoir to allow water to slowly infiltrate into and around the root ball.
- Treegator® bags, or Tree Diapers, can also be used to provide a slow delivery of water over the root balls of establishing trees and shrubs.
New installations should always be watered immediately after planting. It is important to keep new plantings and young plants well-watered, as their root system has not fully developed. Make sure to check the soil right around the base of the plants as this soil may dry out faster than soil in between plants. Too much water can encourage disease and cause plant death, so it’s important to pay attention to the climate (how much sunlight? How hot is it?) and the location of the plants (are they in the shade?) to determine when and how much to water. Always check soil moisture before watering by sticking your finger in the soil up to the second knuckle.
Spring Perennial Plantings:- Week 1: Every day to every other day.
- Weeks 2-3: Water 2-3 times per week, depending on environmental conditions.
- Weeks 4+: Water 2-3 times per week, more in hot/dry conditions. When cooler, water less.
- Week 1: Every day.
- Weeks 2-6: Water 2-3 times per week, depending on environmental conditions.
- Weeks 6+: Water as needed, more in summer months and less in fall.
- Week 1: Every day to every other day.
- Weeks 2-4: Water 1-3 times a week, depending on environmental conditions.
- Weeks 4+: Water less as winter approaches.
- Week 1: Water 1-2 times per week.
- Weeks 2+: As needed. Depending on weather this may be every other day or once a week.
- Weeks 1-2: Every other day.
- Weeks 3+: Water 1-2 times per week, depending on environmental conditions.
FIRST TWO WEEKS AFTER INSTALLATION
- Proper watering is essential to establishment (rooting) of your new sod. It's nearly impossible to over-water new sod!
- As a general rule, keep sod and soil moist all throughout the day. As much as 2 to 6 sprinklings during the day (morning and afternoon) are required until the sod begins to root. Adjust the for location, sprinklers, and temperature.
- Stay off new sod until after the first mowing.
- Try cutting back frequency of irrigations just before the first mow to firm up the soil.
- First mow is approximately 21 days after installation - except in the winter, which will require a longer time before the first mow.
- Mowing high is least stressful to the new sod. Never mow off more than one-third of the grass blade.
- Re-adjust your watering clock or timer. Reduce frequency of waterings gradually after each mowing, while increasing minutes per watering.
- Deeper, less frequent soakings will help roots grow down deeper and establish more quickly into the soil. Pull or tug on turf to check rooting.
- Fertilize your new sod lawn at one month to continue encouraging rooting and establishment.
- Sod not rooting? – Most sod varieties will begin to root within 10 to 14 days. Check watering schedule and adjust to deeper, less frequent soaking. Excessive shade will slow down rooting.
- Bluish-grey spots on lawn or footprints show after being walked on – Drought stressed spots in the lawn. Try increasing minutes per watering and check or adjust sprinkler coverage.
- Mushrooms? – Temporary nuisance, usually growing in compost mixed into the soil at preparation. As irrigation gets deeper and less often, mushrooms usually dry up and wither away.
- Edges turning brown and/or gaps between rolls? – Sod is shrinking or has pulled up at the corners. This is due to lack of irrigation. Increase minutes per watering and frequency to minimize gaps. Also, hand watering sod will help shrink gaps. Press down edges with foot after watering.
- Mulch decreases water evaporation from soil.
- Iterves as a sponge that prevents runoff around plants growing in heavy clay soils or on sloped sites.
- Mulch helps to control seed germination and growth of weeds.
- It insulates the soil and buffers extreme summer and winter soil temperatures.
- Mulch can reduce soil compaction from mowing equipment.
- Mulch prevents damage to stems and trunks by lawn mowers and weed cutters.
- It improves soil health as it decomposes by increasing microbial activity, nutrient- and water-holding capacity, soil pore spaces, and air penetration.
* Don't add more than a 3-inch layer of mulch because deep mulch applications may:
- Prevent movement of rain or irrigation water into the root ball of newly planted trees and shrubs. This can result in roots drying up and plant stress.
- Lead to root production and growth in the mulch. This often results in circling and stem-girdling roots.
- Reduce oxygen levels around roots and cause root suffocation.
- Keep poorly drained soils too wet, which favors root rot development.
- Keep bark excessively wet when piled around trunks and stems. This may lead to bark decay.
- Create habitat for rodents that chew bark and girdle trunks and stems.